Introduction
In this blog I write about payment as a gateway into springboot applications. Now digital payment is mostly used as a world wide and integrated payment gateway into your application to make your application efficient and fastest payment. We all know that many services provide online payment fastest and safest.
In this blog, I used razorpay for integration. There are many services like paytm, paypal for payment gateway integration and make your payment safe and fast.
What is payment gateway
A payment gateway is a technology platform that provides services to businesses that accept, manage and handle payment from the customer to business. Payment gateway processes the managed payment flow. It is a link between business and customer. There are many payment gateway API providers that provide your application secure data transfer solutions.
Prerequisites
- Java 17
- Maven
- Spring Boot Development Environment (here IntelliJ IDEA)
- Payment gateway platform account (Here razorpay account)
Set up Payment gateway platform (razorpay)
- Sign up on razorpay Account.
- Complete account set up
- Generate API keys like publish key and secret key.
- Secure your API keys.
Steps to Integrate a Payment Gateway with Spring Boot Application
Step 1 : Add razorpay dependency into your application.
					 <dependency>
			<groupId>com.razorpay</groupId>
			<artifactId>razorpay-java</artifactId>
			<version>1.4.3</version>
		</dependency>
Step 2 : Configure Application Properties
Add the razorpay credentials into the application.properties:
					payment.gateway.secretKey=sk_test_1234567890
payment.gateway.publishableKey=pk_test_1234567890
Step 3 : Write service for creating order
In this service we integrated razorpay Rest API. It initializes the razorpay client using your credentials. And razor pay clients provide functionality to create orders.
					import com.razorpay.RazorpayClient;
import org.json.JSONObject;
@Service
public class RazorpayService {
    private RazorpayClient razorpayClient;

   @Value("${payment.gateway.secretKey}")
    private String secretKey;

    @Value("${payment.gateway.publishableKey}")
    private String publishableKey;


    public RazorpayService() {
        try {
            razorpayClient = new RazorpayClient(secretKey, publishableKey);
        } catch (Exception e) {
            e.printStackTrace();
        }
    }

    /**
     * This method creates a Razorpay order and returns the order details.
     *
     * @param amount the order amount in INR (multiplied by 100 to convert into paise)
     * @return JSON string containing the order details, including order ID
     */
    public String createOrder(int amount) {
        JSONObject options = new JSONObject(); // Prepare order options
        options.put("amount", amount * 100);   // Convert amount to paise (Razorpay accepts only paise)
        options.put("currency", "INR");       // Specify currency (INR)
        options.put("receipt", "order_rcptid_11"); // Custom receipt identifier for tracking orders
        options.put("payment_capture", 1);    // Automatically capture payments

        try {
            // Call Razorpay's Orders API to create an order
            return razorpayClient.orders.create(options).toString();
        } catch (Exception e) {
            e.printStackTrace(); // Handle exceptions
            return null;
        }
    }
}
Razerpay client : By using constructor we enable the communication between our application to the razorpay server using our credentials.
Create order method is take data like amount and currency and called razorpay API and return order detail json as sting with unique order id.
Step 4 : define controller
Define the endpoint in the controller that will invoke the created by the front end to order functionality.
					 * API endpoint to create an order in Razorpay.
 *
 * @param amount the order amount in INR (to be converted to paise by the service)
* @return ResponseEntity containing the created order details or an error message */

@PostMapping("/create-order")
    public ResponseEntity<?> createOrder(@RequestParam int amount) {
        try {
            String orderResponse = razorpayService.createOrder(amount);
            if (orderResponse != null) {
                return ResponseEntity.ok(orderResponse);
            } else {
                return ResponseEntity.badRequest().body("Failed to create Razorpay order.");
            }
        } catch (Exception e) {
            e.printStackTrace();
            return ResponseEntity.status(500).body("An error occurred while creating the order.");
        }
    }
Step 5 : Verify Payment
Create a service to verify payment. To ensure payment is secure razorpay provides verify services.
					public boolean verifyPayment(String orderId, String paymentId, String razorpaySignature) {
  String payload = orderId + '|' + paymentId;
  try {
    return Utils.verifySignature(payload, razorpaySignature, razorpayConfig.getSecret());
  } catch (Exception e) {
    e.printStackTrace();
    return false;
  }
}
Step 5 : Test the API with tools like postmen
Here I test the endpoint using postmen.

In the response you will get order detail json as sting with uniq by order is.
By this order ID handles payment on the client side.
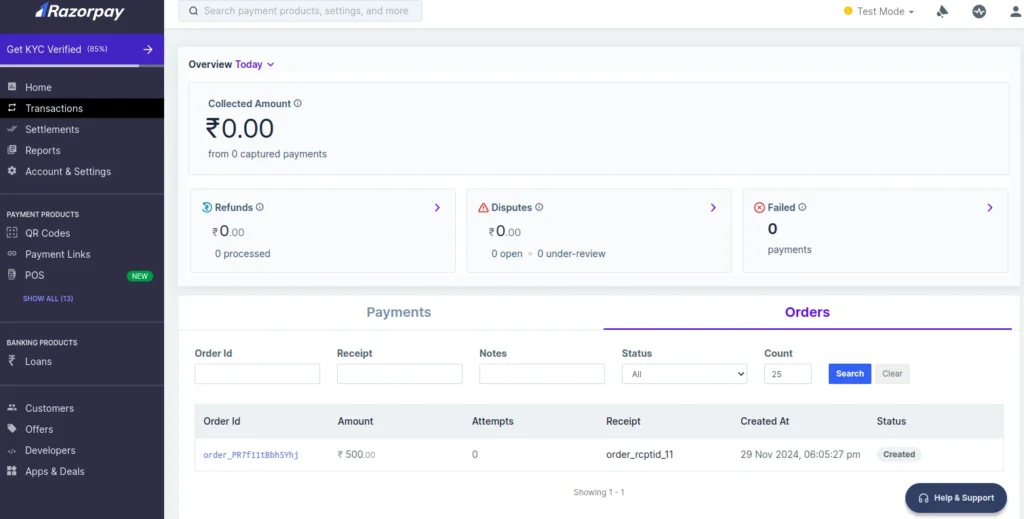
You can also see the log of the order in the razorpay dashboard.

Conclusion
Razepay integration with springboot application it’s a straightforward process. It is mostly used in India for its simple and secure process.You can easily set up payment processes, create and verify order and payment into your application. In this blog you get the step by step process of integration of razor pay.


