Introduction
Docker has revolutionized the way developers deploy applications by allowing them to package applications and dependencies into containers that can be easily transported. In this blog, we will learn how to containerize a Node.js application that uses MySQL by utilizing Docker and Docker Compose. Containerizing Node.js applications provide several benefits, such as streamlined deployment, improved portability, scalability, and version control.
Prerequisites
- Node.js and npm
- Sequelize
- Express
- MySQL
A Closer Look at Docker Compose in Development Workflow
To successfully implement Dockerizing Node.js and MySQL, it’s important to have a good understanding of Docker fundamentals and key aspects. Therefore, it is important to familiarize ourselves with the basics before delving into the code and functionalities. This will ensure a better comprehension of the upcoming code and functionalities, leading to a seamless implementation.
Docker is a powerful software platform that enables you to develop, test, and deploy your applications rapidly. It utilizes standardized units called containers, including all the necessary components such as libraries, system tools, code, and runtime to run the software seamlessly. Let’s understand a few terminologies that will play a pivotal role in shaping our understanding throughout the course of this blog.
Docker-Compose : Allows you to create and share multi-container applications with ease. We will utilize this tool in our guide.
Docker Containers : A software package that works with all the dependencies required to run an application.
Docker Images : A template that contains the instructions for the Docker Container.
Docker Network : Provides the Reliability to run multiple containers or services on the same network.
A Comprehensive Guide to Dockerizing Node.js and MySQL with Docker Compose
In this blog, we’ll guide you through establishing an authentication application using Node.js and MySQL as the database. The focus of this blog revolves around the process of Dockerizing Node.js and MySQL. For the UI implementation, refer to the following link: Authentication and Authorization in React.
Follow along as we create a robust and containerized environment for a secure authentication system.
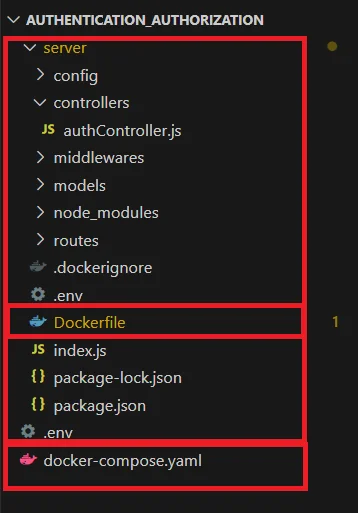
Here is the folder structure for the application. In this image, we have highlighted the important files for the Docker setup.
Navigating the Onset of Backend Server Setup
Let’s start exploring the process of building Node.js Rest APIs using an Express web server. We will also be setting up a MySQL database and using Sequelize to connect to it, as well as creating a Sequelize Model, writing a controller, and defining routes for handling all authentication operations.
- Initializing NodeJS Application : Firstly, we need to create our project folder for that in your root directory and create a server folder in it. Then move to create package.json file and install the required dependencies using the following commands.
You can quickly determine the following dependencies that come packaged in the project:
- Express: The web framework to easily build RESTful APIs.
- Sequelize: The Object Relational Mapping (ORM) performs database queries easily.
- MySQL2: The MySQL driver used by Sequelize to interact with a MySQL database.
//Create a package. Json file // Install the dependencies |
2. Setup Express web server, server.js : In the project server folder, create a new index.js file which will be the Server Entry Point file.
					dotenv.config(); // Load environment variables from a .env file into process.env

const app = express(); // Create an Express application instance

const PORT = process.env.PORT || 8000;

// Create a Sequelize instance for connecting to the database
const sequelize = new Sequelize(process.env.DB_NAME, process.env.DB_USER, process.env.DB_PASSWORD, {
  host: process.env.DB_HOST,
  port: process.env.DB_PORT,
  dialect: 'mysql',
});

// Function to check the database connection
async function checkDatabaseConnection() {
  try {
    await sequelize.authenticate();
    console.log('Connected to the database');
  } catch (error) {
    console.error('Unable to connect to the database:', error.message);
    process.exit(1);
  }
}

// Define models using Sequelize and initialize the User model
export const models = {
  User: User.init(sequelize, Sequelize),
};
// Sync the database models with the database schema
sequelize
  .sync()
  .then(() => console.log("Connected to the database"))
  .catch((err) => console.error("Unable to connect to the database", err));


app.use(express.json()); // Use middleware to parse incoming JSON requests

app.use("/auth", authRoutes); // Use authentication routes under the "/auth" path

// Define a protected route using authentication middleware
app.get("/protected", authMiddleware, (req, res) => {
  res.json({ msg: "Protected Route Accessed" });
});

// Check the database connection before starting the server
checkDatabaseConnection().then(() => {
  app.listen(PORT, () => {
    console.log(`Server is running on http://localhost:${PORT}`);
  });
});
Let’s comprehend what we’ve written in the code.
- import express, body-parser, dotenv, sequelize and cors modules:
- Express is for building the Rest apis
- body-parser helps to parse the request and create the req.body object
- cors provides Express middleware to enable CORS with various options
- dotenv for configuring the environmental variables
- sequelize provides an efficient way to connect with DB
- create an Express app, then add body-parser and cors middlewares using app.use() method. Notice that we set origin: http://localhost:8000
- create a Sequelize instance for connecting to the database and Define models using Sequelize and initialize the User model
- define a /auth route which is simple for authentication apis
- Define a /protected route using authentication middleware for to autherize the user
- listen on port 8080 for incoming requests
Run the Application using the npm start command.
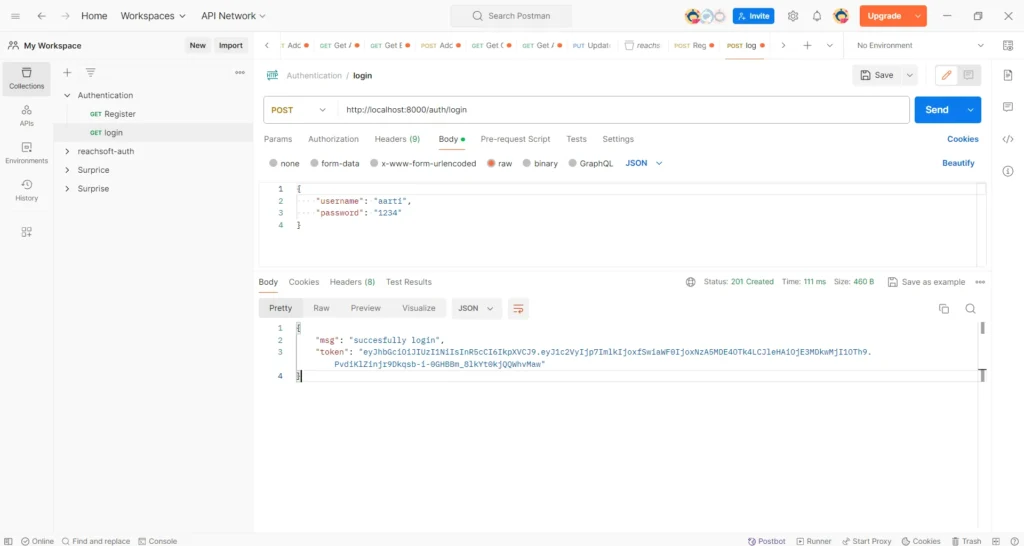
3. Setting up for Authorization for a User : We will use JSON Web Token to implement authorization, which is a secure way to transfer encrypted data over the internet while maintaining confidentiality between parties.
To implement JWT,
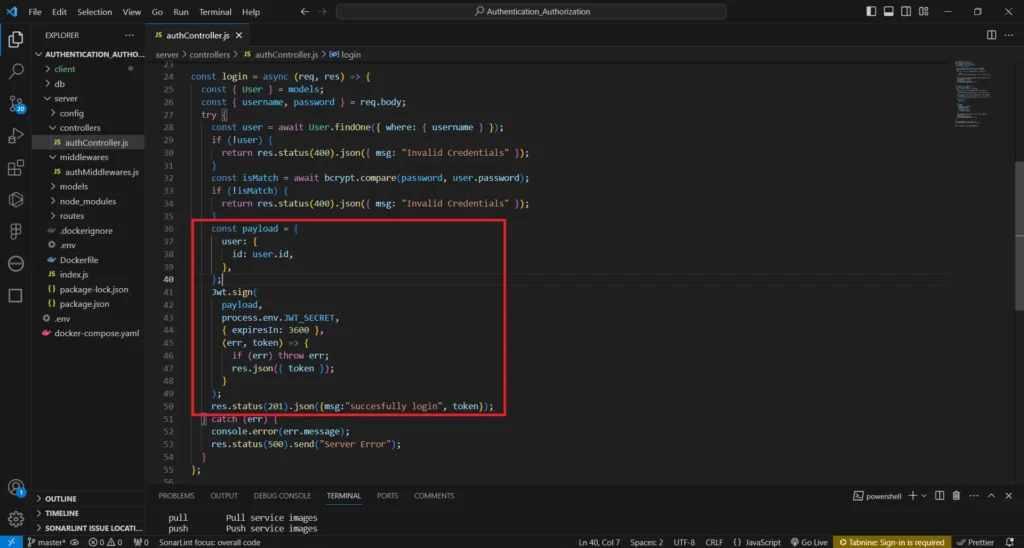
– We have created and stored the token in the user modal in the /login API of the authController file.
– We have also created a /protected route that uses the authMiddleware file to verify the authorization token with the token stored in our database for that user. This allows us to check the API request header and ensure that the user is authorized to access the protected route.
					// authMiddleware.js file

import Jwt from "jsonwebtoken";

const authMiddleware = (req, res, next) => {
  const token = req.header("Authorization");
  console.log(token);
  if (!token) {
    return res.status(401).json({ msg: "No token, authorization denied" });
  }

  try {
    const decoded = Jwt.verify(token, process.env.JWT_SECRET);
    req.user = decoded.user;
    next();
  } catch (err) {
    res.status(401).json({ msg: "Token is not valid" });
  }
};

export default authMiddleware;
Start Working With Docker
Here, We are setting up a Docker container for Express server, and MySQL DB.
For initializing a Docker container, create a ‘docker-compose.yml / docker-compose.yaml’ file to define the services and their configurations, and also ‘Dockerfiles’ for every folder. When setting up a Dockerized application, communication between containers is typically achieved through Docker networking. Each container runs in its isolated environment, and Docker provides a way for containers to communicate with each other using container names or service names.
The structure of the project for the application is as follows.
my-docker-app/ |– server/ (Node.js Server) | |– Dockerfile | |– (other server files) | |– DB/ (MySQL DB) | |– Dockerfile | |– docker-compose.yml |
- Create Docker Image for NodeJS Application : The Dockerfile should be provided to build an image of the NodeJS Application. it contains the following lines:
FROM node:latest # Use an official Node runtime as a parent image WORKDIR /app # Set the working directory in the container COPY package*.json ./ # Copy package.json and package-lock.json to the container RUN npm install # Install app dependencies COPY . . # Copy the React app files to the container CMD [“npm”, “start”] # Command to run the application |
The process is simple. The Dockerfile employs an image that is dependent on NodeJS’s latest version. The container has the required dependencies installed in it and the project files are copied over. The port for running the App is exposed and the CMD (npm start) is given as the command to run when the container starts.
2. Create Docker Image for NodeJS Application : Currently, we have the NodeJS App image and we will use the official MySQL Docker image that is available in the Docker Hub. We can manually start up both components and link them together by using the database credentials to run the App, we will simplify the process by linking their deployments together using Docker Compose in the next section.
3. Node.js and MySQL with Docker Compose Essentials : Docker Compose is the ultimate solution for orchestrating multi-container applications. To get started, simply create a docker-compose.yml file in your project directory and add the provided configuration.
Note : Please ensure that the spacing is correct. Define the services and network for running the container in the docker-compose.yml.
					version: '3.4'

services:
  mysqldb:
    image: mysql:5.7
    restart: unless-stopped
    env_file: ./.env
    environment:
      - MYSQL_ROOT_PASSWORD=$MYSQLDB_ROOT_PASSWORD
      - MYSQL_DATABASE=$MYSQLDB_DATABASE
    ports:
      - $MYSQLDB_LOCAL_PORT:$MYSQLDB_DOCKER_PORT
    volumes:
      - db:/var/lib/mysql
    networks:
      - auth-networks

  server:
    build: ./server
    depends_on:
      - mysqldb
    env_file: ./.env
    restart: unless-stopped
    environment:
      - DB_HOST=mysqldb
      - DB_USER=$MYSQLDB_USER
      - DB_PASSWORD=$MYSQLDB_ROOT_PASSWORD
      - DB_NAME=$MYSQLDB_DATABASE
      - DB_PORT=$MYSQLDB_DOCKER_PORT
      - CLIENT_ORIGIN=$CLIENT_ORIGIN
    ports:
      - $NODE_LOCAL_PORT:$NODE_DOCKER_PORT
    networks:
      - auth-networks
    command: npm start


networks:
  auth-networks:
    driver: bridge

volumes:
  db:
This Docker Compose configuration defines two services : server for the NodeJS application and mysqldb for the MySQL database. When Docker Compose processes these configurations, the server service builds the image based on the Dockerfile in the project’s root directory, whereas the mysqldb service uses the official MySQL image and sets the environment variables for the database configuration.
To ensure dependency ordering, the depends_on attribute ensures that the NodeJS application starts after the MySQL database. To connect the Server to the MySQL database, we provide the database credentials as environment variables to the MySQL service’s environment attributes. This is done as an enhanced security measure, so the credentials remain hidden from the project source code.
The following environment attributes present in the server service are provided as environment variables to the App container at runtime:
– DB_HOST: Since both services are in the same network, the database instance is addressable via the mysqldb service name.
– DB_PORT: The database port.
– DB_NAME: the database name.
– DB_USERNAME: The username to access the DB with.
– DB_PASSWORD: The password to access the DB with.
NodeJS automatically picks them up and makes these database details available in the process.env object used by the db.config.js file.
4. Executing the Node.js Application with MySQL in Containers: To run the App via Docker Compose, open a terminal, navigate to the project’s root directory, and run the following commands.
Create Build: to create a build of the application run the following command docker-compose build Run using: to run the application run the following command docker-compose up -d Stop Using: to stop the application run the following command |
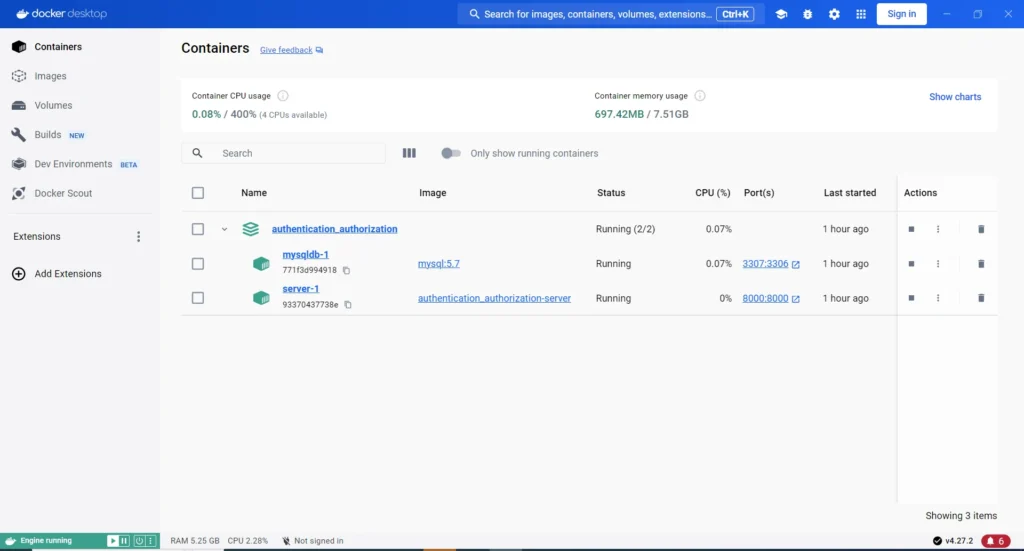
Docker Compose builds NodeJS App and MySQL images, creates containers and network, and starts them with logs from both.
By using Docker Desktop, you can easily monitor the state of your Docker environment. This includes viewing a summary of your running containers, as shown below.
Conclusion
We were able to package a NodeJS application and MySQL database into separate containers and deploy them as a cohesive application stack by following the steps outlined in this guide using Docker Compose. Additionally, this guide provides a comprehensive way to create an authentication backend server and implement JSON web token for authorization.
If you’re interested in the UI implementation for this application, please check out this link: Authentication and Authorization in React.

